Category Archives: Health

Magical Bone Broth Recipe

My introduction to bone broth came from reading a book on fasting. It recommended consuming homemade bone broth to provide essential nutrients and to help with hunger pains while fasting, however, you don’t need to fast to enjoy its many health benefits. The important thing to know is you can’t buy high quality bone broth.  There are tons of brands out there that tout labels of “organic” and “grass-fed,” but trust me, I’ve tried them and it’s not the same.  You just have to make the magical and natural concoction yourself.

I’ve made bone broth using both chicken and beef bones. My personal preference is chicken over beef. Each has it’s own distinct flavor, but I find the chicken reminds me of a rich immune-boosting homemade chicken noodle soup sans noodles. I discussed the magical properties of Bone Broth last week on The Mike O’Meara Show and many of the TMOS listeners asked me to post the recipe. So here goes:

The Best Bones

The best bones are the ones that do the most moving (such as joints) and contain the most marrow. Instead of using chicken legs, use the whole quarter–or even better, the whole chicken. Chicken feet and beef knuckles have the most collagen and will make for a richer and healthier batch.  If you’re going to spend the effort making this then you might as well make the best batch possible.  Check your local farmer’s market for buying grass-fed beef bones or organic chicken.  Check international grocery stores for buying chicken feet if your local butcher or farmer’s market doesn’t carry them.

Chicken Preparation

If cooking chicken legs, quarter, or whole chicken then you’ll want to save the chicken stock from the initial boil.  If cooking beef bones or chicken feet skip this step.

  • Put chicken in a large stockpot, cover with water, add a few generous pinches of pink Himalayan salt, and simmer until meat is cooked (about 15-20 minutes after you start to see bubbles).
  • Take meat and bones out of water, pull meat off bones (if using bones with meat) and save for another recipe/meal, continue to simmer water and proceed to final directions.

Chicken Feet and Beef Bone PreparationChicken Feet

If cooking with beef bones or chicken feet you’ll want to prepare them with a quick boil and then dump the water. It won’t smell especially pleasant and you don’t want to reuse like you would if doing a full chicken.

  • Boil the chicken feet or beef bones for 5-10 minutes.
  • Remove from pot and dump the water.
  • If cooking chicken feet, cut off the tips of toes/claws and discard.
  • Proceed to final directions.

Final Directions

    • Place bones on a sheet pan and roast at 450-500 degrees for 45-60 minutes. Bones will become golden brown and smell really good. They can take a lot of heat. The longer they roast (without burning) the better the broth will taste.
    • If you prepared chicken then return it into the existing chicken stock.   If you prepared chicken feet or beef bones:  Place roasted bones into the stockpot with fresh water and add a few generous pinches of pink Himalayan salt.
    • As the broth cooks down, you’ll need to add more water. This is usually done 2-3 times during the entire cooking process depending on how long you simmer the broth and bones.
    • Simmer chicken bones at least 8-10 hours and beef bones at least 24-48 hours.  If you aren’t comfortable leaving the stove on that long, you can place the broth and roasted bones in a crockpot and continue the process there.
    • When broth is done, remove bones, and pour through fine mesh strainer or sieve.

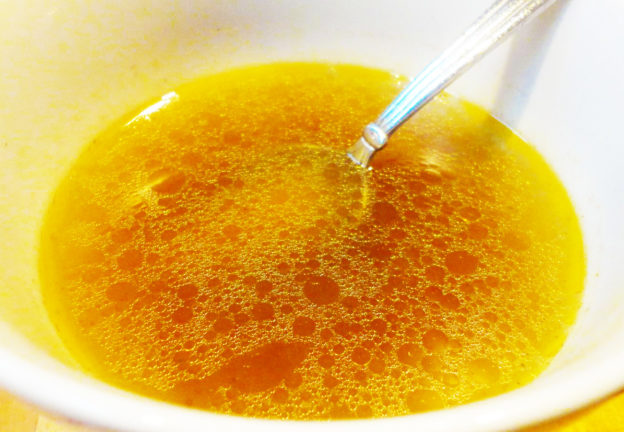
Congrats on making your first batch of healthy homemade bone broth.  It is best consumed over the next few days, but it can also be frozen if you want to consume it at a later time. I portion the broth before freezing so it’s easy to thaw and drink when I need a quick immune boost or when I’m doing a shorter fast and need a smaller amount. Enjoy!

What’s in your water? Part 2

Distilled Tap WaterI have found out what’s in my tap water–Brown nasty chemical-smelling crap.   And it’s not just in my water but yours too.  I used a water distiller on 2 gallons of my tap water and the leftover is shown in this photo.  Go ahead and click on it for the full image.  I dare you.  It’s darker than a lager beer and smells of deadly toxins.  Would you drink this?  No, I don’t think so.  But you probably are if you are not using a distiller or high quality filter.

Megahome Countertop Water Distiller

Megahome Countertop Water Distiller

I purchased the Megahome Water Distiller so that I can remove fluoride from tap water.  This is something a regular water filter cannot do.  I could go on and on about why fluoride is not safe for you.  But instead, I’ll point you to the warning label on the back of your toothpaste:

“WARNING: Keep out of reach of children under 6 years of age. If you accidentally swallow more than used for brushing, get medical help or contact a Poison Control Center right away.”

If it says that on toothpaste then why is it a good idea to put fluoride in our drinking water?  I don’t understand it and I don’t want to get in a debate with any dental hygienists or conspiracy theorists.  I’m just going to remove it from my water.

In summary, if you drink tap water then you might as well be drinking out of the toilet.  Once you see and smell what is in your water, you will stop drinking it, and switch to bottled water or distill it like me.  I’m still using my ZeroWater filter too.  But now I pour the distilled water into that.  It really makes for some great tasting water.

If you decide to buy any of these items please go through my online store so I get some Amazon credit.  That way I can get more filters.  Or maybe just cash.  That’s nice too.


Read What’s in your water – Part 1 to learn more about water filters

What’s in your water? Part 1

zerowater

I never thought about how good water filters were until I ordered a ZeroWater filter and it included a water testing tool.  They claim their filter results in water with 0 PPM (parts per million).  The higher the number means more particles and contaminants that not only make water taste bad but can also be bad for your health. It’s time for an experiment.


I tested my tap water, a bottle of spring water, and the ZeroWater filter:

Tap Water - 159 PPM

Tap Water – 159 PPM

Acadia Bottle Water - 24 PPM

Bottle Water – 24 PPM

ZeroWater - 0 PPM

ZeroWater – 0 PPM


My tap water clocked in at 159 PPM.  Is that a good number?  Apparently the World Health Organization says that water with a TDS (total dissolved solids) of 1,000 PPM is “acceptable” and under 600 PPM is “good.”  Yeah, maybe if you’re living in a tent in Africa it’s good but for us fussy Americans we want crystal clear drinking water without any off-flavors.  The higher the PPM number means the worse it will taste.  The bottle of Acadia Natural Spring Water was much better at 24 PPM.  And my new ZeroWater filter, as promised, clocked in at 0 PPM.  Guess it’s not marketing fluff after all.

I have two other water filters in my house–My refrigerator’s water filter (uses a PUR filter) and a Dr. Mercola filter that was pretty expensive.  In full disclosure, the refrigerator filter was replaced 2 months ago and the Dr. Mercola filter has about 5 months of use on it.  The refrigerator filter definitely gets more use than the Dr. Mercola filter.  The results really shocked me:

Refrigerator Water

My Refrigerator

Fridge Water - 171 PPM

Fridge Water – 171 PPM

My refrigerator PUR water filter is worse than my tap water at 171 PPM! How can that be?

Shouldn’t it be removing something?


Dr. Mercola Water Filter

Dr. Mercola Water Filter

Dr. Mircola's Pure & Clear - 178 PPM

Dr. Mircola’s Pure & Clear – 178 PPM

The worse rating goes to the expensive Dr. Mercola Pure & Clear drinking water filter which clocked in 178 PPM. It’s probably only fair to test the filters when they are brand new but I would still think that even if they are a few months old it shouldn’t be adding anything to the water.

I really like companies that back up their product claims, and the fact that the ZeroWater filter included a TDS water testing tool speaks volumes.   The instructions say to replace the ZeroWater filter once it gets to 6 PPM.  Maybe they should tell that to the entire water bottle industry.


Continue reading What’s in my Water – Part 2